Building applications that scale through proper scheduling

Joys of timeshare As we transtion to building distributed systems, we need to shed some of the anti-patterns of web application development that we have applied for ages. The ease of compute access made most of us think that we can process every job interactively, and when things slow down, we just scale by virtue of adding instances. Now when that wasn’t the case, and scaling compute actually meant that a real estate operation was required (AKA “get more room to get more mainframes”) back in the day, we actually had process differentiation. Batch jobs would run on specific time windows when CPU time was available.

Now traditionally, if your application is super complex, you have most likely been through this. You are probably using a message queue or ESB. This post might not be for you. Now if you are still just piling up code in Rails or Node, there are things that you can probably offload as batch (or in my case, parameterized dispatch, but I’ll explain that later). So here I’ve got this library app that I use at home to keep track of my books, and adding a book is, let’s say, a lot of work.

  def create(isbn)
  #Check if we got an ISBN
    unless isbn.nil?
    #Check if the ISBN exists already
      if self.by_isbn(isbn)[0] == false
      #Try to retrieve it from openlibrary or fail gracefully
        begin
          uri = URI("https://openlibrary.org/api/books?bibkeys=ISBN:#{isbn}&jscmd=data&format=json")
          response = Net::HTTP.get(uri)
        rescue
          return [false, "Cannot connect to OpenLibrary API"]
        end
        if response != nil
          key, data = JSON.parse(response).first
          #Sanitize so much data
          unless data.nil?
            if data["authors"].nil?
              authors = 'Unknown'
            else
              authors = data["authors"][0]["name"].to_s
            end
            if data["identifiers"].key? 'isbn_10'
              isbnadd = data["identifiers"]["isbn_10"][0]
            else
              isbnadd = data["identifiers"]["isbn_13"][0]
            end
            if data.key? 'cover'
              if data["cover"].key? 'large'
                image = data["cover"]["large"].to_s
              else
                if data["cover"].key? 'small'
                  image = data["cover"]["small"].to_s
                else
                  image = "http://104.130.11.24/images/noimage.jpg"
                end
              end
            end
            if data.key? 'subtitle'
              subtitle = data["subtitle"].to_s
            else
              subtitle = '-'
            end
            #Encrypt everything as I'm the tinfoil kind of guy
            book = {
              "isbn" => isbnadd,
              "title" => @vault.encrypt(data["title"].to_s, 'library', 'morbury'),
              "thumbnail_url" => @vault.encrypt(image, 'library', 'morbury'),
              "subtitle" => @vault.encrypt(subtitle, 'library', 'morbury'),
              "url" => @vault.encrypt(data["url"].to_s, 'library', 'morbury'),
              "publish_date" => @vault.encrypt(data["publish_date"].to_s, 'library', 'morbury'),
              "author" => @vault.encrypt(authors, 'library', 'morbury'),
              "publishers" => @vault.encrypt(data["publishers"][0]["name"].to_s, 'library', 'morbury'),
            }
            #Store in Consul
            if Diplomat::Kv.put("library/#{isbn}", book.to_json, { http_addr: ENV['CONSUL_HTTP_ADDR'], dc: "stn", token: @vault.getConsulToken})
              return [true, isbn]
            else
              return [false, "Error storing book with ISBN #{isbn}"]
            end
          else
            return [false, "Book not found in the OpenLibrary API"]
          end
        else
          return [false, "Book not found in the OpenLibrary API"]
        end
      else
        return [false, "ISBN already exist"]
      end
    else
      return [false, "ISBN cannot be empty"]
    end
  end
  

Now from a user perspective, sure I’m going to see the spinning wheel for a while, but from a compute perspective, it is even worse as I’m wasting a thread that could be used for interactive traffic. Then again I could spawn a thread in the system, but the Linux scheduler has a somewhat “local” view of the world as it would be expected. So how about a scheduler that has a more global view? Weren’t you all using Kubernetes? Well not me, clearly, but then again this pattern would work with any scheduler.

Nomad has this functionality of dispatching a previously defined job, with an added parameter. So if I wanted to do a “distributed” ping

job "ping" {
  region = "uk"
  type = "batch"
  datacenters = ["dc1"]
  parameterized {
    payload       = "forbidden"
    meta_required = ["ADDRESS"]
  }

  group "ping" {
    count = 1
    task "ping" {
      driver = "exec"
      config {
        command = "ping"
        args = ["-c10", "${NOMAD_META_ADDRESS}"]
      }
      resources {
        cpu = 100 # Mhz
        memory = 128 # MB
        network {
          mbits = 10
        }
      }
    }
  }
}

and I can dispatch it using the CLI like so:

$ nomad job dispatch -meta ADDRESS=192.168.50.1 ping
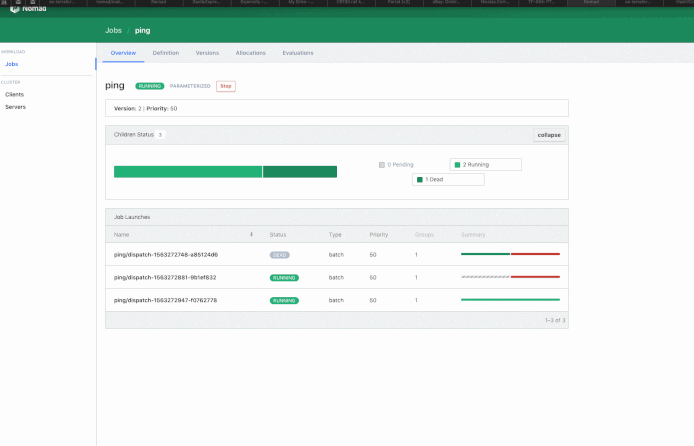
Dispatched Job ID = ping/dispatch-1563272947-f0762778
Evaluation ID     = 3837a46e

==> Monitoring evaluation "3837a46e"
    Evaluation triggered by job "ping/dispatch-1563272947-f0762778"
    Allocation "5a261c73" created: node "6c2b39dc", group "ping"
    Evaluation status changed: "pending" -> "complete"
==> Evaluation "3837a46e" finished with status "complete"
$

And the result would be something like:

Scalable pings

In my case… I’d spawn a Nomad Job upon receiving an API Call:

post '/v1/books/:isbn' do
  content_type :json
  key = params['key']
  if key == @@vault.getAPIKey
    payload = {
      :Meta => {
        :ISBN => params['isbn']
      }
    }.to_json
    if @@books.by_isbn(params['isbn'])[0].to_s == 'false'
      dispatchkey = @@vault.getNomadDispatchToken
      begin
        uri = URI.parse("http://nomad.service.consul:4646/v1/job/addbook/dispatch")
        header = {'X-Nomad-Token': dispatchkey}
        logger.info "Making request to Nomad to add Book #{params['isbn']}"
        http = Net::HTTP.new(uri.host, uri.port)
        request = Net::HTTP::Post.new(uri.request_uri, header)
        logger.info payload
        request.body = payload
        response = http.request(request)
        success = response.code
        logger.info "Nomad's response is #{success}"
      rescue
        message = [false, "Cannot connect to Nomad"].to_json
        status 500, message
      end
      if success.to_s == '200'
        jobstatus = JSON.parse(response.body)
        readkey = @@vault.getConsulReadToken
        logger.info "Job to add isbn #{params['isbn']} dispatched succesfully"
        output = [true, readkey, jobstatus].to_json
        status 200
        output
      else
        halt 500, response.body
      end

    else
      halt 500, "Book already exists".to_json
    end
  else halt 401, "Unauthorized".to_json
end
end

As you can see there I’m getting a Consul Token that I’m passing to the UI (it lasts for a minute) and I’m getting another Nomad token from Vault (which expires in 5 minutes) to do the request.

Final result looks fantastic

Scalable book adding


About the author: Nicolas Corrarello is the Regional Director for Solutions Engineering @ HashiCorp based out of London.

A table of application development for the hashistack.

And now for a short update, here’s my HashiConf presentation for this year.

HashiConf 2018: A tale of application development for the HashiCorp Stack

Understanding the performance overhead of encryption and it's upside

Every modern application has a requirement for encrypting certain amounts of data. The traditional approach has been either relying on some sort of transparent encryption (using something like encryption at rest capabilities in the storage, or column/field level encryption in database systems). While this clearly minimizes the requirement for encryption within the application, it doesn’t secure the data from attacks like a SQL Injection, or someone just dumping data since their account had excessive privileges, or though exposure of backups.

In comes the requirement of doing encryption at the application level, with of course the expected complexity of doing a right implementation at the code level (choosing the right cyphers, encryption keys, securing the objects), and securing and maintaining the actual encryption keys, which more often than not, end in version control, or in some kind of object store subject to the usual issues.

Traditionally, there has been different approaches to secure encryption keys: An HSM could be used, with considerable performance penalty. An external encryption system, like Amazon’s KMS, or Azure Key Vault, or Google KMS’s, where the third party holds your encryption key. Ultimately, HashiCorp’s Vault offers it’s own Transit backend, which allows (depending on policy) to offload encryption/decryption/hmac workflows, as well as signing and verification, abstracting the complexity around maintaining encryption keys, and allowing users and organizations to retain control over them inside Vault’s cryptographic barrier. As a brief summary of Vault’s capabilities, when it comes to encryption as a service, we can just refer to Vault’s documentation.

The primary use case for transit is to encrypt data from applications while still storing that encrypted data in some primary data store. This relieves the burden of proper encryption/decryption from application developers and pushes the burden onto the operators of Vault. Operators of Vault generally include the security team at an organization, which means they can ensure that data is encrypted/decrypted properly. Additionally, since encrypt/decrypt operations must enter the audit log, any decryption event is recorded.

The objective of this article, however, is not to explain the capabilities of Vault, but rather to do an analysis of what’s the overhead of using Vault to encrypt a single field in the application.

For that purpose, a MySQL data source is used, using the traditional world database (with about 4000 rows), and the test being run will effectively launch a single thread per entry, that will encrypt a field of such entry, and then persist it to Amazon S3.

This test was run on an m4.large instance, in Amazon, running a Vault Server, with a Consul backend, a MySQL server, and the script taking the metrics, all on the same system. It is inspired on a traditional Big Data use case, where information needs to be persisted to some sort of object store for later processing. The commented Python function being executed in each thread is as follows:

def makeJson(vault, s3, s3_bucket, ID, Name, CountryCode, District, Population):
        # Take the starting time for the whole function
        tot_time = time.time()
        # Take the starting time for encryption
        enc_time = time.time()
        # Base64 a single Value
        Nameb64 = base64.b64encode(Name.encode('utf-8'))
        # Encrypt it through Vault
        NameEnc = vault.write('transit/encrypt/world-transit', plaintext=bytes(Nameb64), context=base64.b64encode('world-transit'))
        # Calculate how long it took to encrypt
        eetime = time.time() - enc_time
        # Create the object to persist and convert it to JSON
        Cityobj = { "ID": ID, "Name": NameEnc['data']['ciphertext'], "CountryCode": CountryCode, "District": District, "Population": Population }
        City = json.dumps(Cityobj)
        filename = "%s.json" % ID
        # Take the starting time for persisting it into S3, for comparison
        store_time = time.time()
        # Persist the object
        s3.put_object(Body=City, Bucket=s3_bucket, Key=filename)
        # Calculate how long it took to store it
        sstime = time.time() - store_time
        # Calculate how long it took to run the whole function
        tttime = time.time() - tot_time
        print("%i,%s,%s,%s\n" % (int(ID), str(sstime), str(eetime), str(tttime)))

This would render a single line of a CSV, per thread, that later was aggregated in order to analyze the data. The average, minimum and median values are as follows: Avg/Min/Med

As for concurrency, this is running 4 thousand threads that are being instantiated on a for loop. According to this limited dataset (about 4000 entries) we’re looking at a 5% ~ 10% overhead, in regards to execution time. Data Points

It’s worth noting that during the tests Vault barely break a sweat, Top reported it was using 15% CPU (against 140% that Python was using). This was purposely done in a limited scale, as it wasn’t our intention to test how far could Vault go. Vault Enterprise supports Performance replication that would allow it to scale to fit the needs of even the most demanding applications. As for the development effort, the only complexity added would be adding two statements to encrypt/decrypt the data as the Python example shows. It’s worth noting that Vault supports convergent encryption, causing same encrypted values to return the same string, in case someone would require to look for indexes in WHERE clauses.

Using this pattern, along with the well known secret management features in Vault, would help mitigate against the Top 10 database attacks as documented by the British Chartered Institute for IT:

  1. Excessive privileges: Using transit, in combination of Vault’s Database Secret Backend, an organization can ensure that each user or application get’s the right level of access to the data, which in its own can be encrypted, requiring further level of privilege to decode it.

  2. Privilege abuse: Using transit, the data obtained even with the right privileges is encrypted, and potentially requiring the right “context” to decrypt it, even if the user has access to.

  3. Unauthorized privilege elevation: Much like in the cases above, Vault can determine what is the right access a user gets to a database, effectively terminating the “Gold credentials” pattern and encrypting the underlying data from operator access.

  4. Platform vulnerabilities: Even if the platform is vulnerable, the data would be secure.

  5. SQL injection: As data is not transparently encrypted, a vulnerable application would mostly dump obfuscated data, that can be re-wrapped upon detection of a vulnerability to an updated encryption key.

  6. Weak audit: Vault audits encryption and decryption operations, effectively creating an audit trail which would allow to pinpoint exactly who has access to the data.

  7. Denial of service: Through Sentinel, our policy as code engine, Vault can evaluate traffic patterns through rules and deny access accordingly.

  8. Database protocol vulnerabilities: As before, even if the data is dumped, it wouldn’t be transparently decrypted.

  9. Weak authentication: Using Vault’s Database secret backend, would generate short lived credentials which can be revoked centrally, and have the right level of complexity.

  10. Exposure of backup data: Backups would be automatically encrypted, just like the underlying data.


About the author: Nicolas Corrarello is the Regional Director for Solutions Engineering @ HashiCorp based out of London.

Reading Vault Secrets in your Jenkins pipeline

The Jenkins credential store in most enterprises is becoming a potential attack vector. It’s generally filled with long lived credentials, sometimes even to production systems.

In comes Hashicorp’s Vault, a Secret Management solution that enables the secure store of secrets, and dynamic generation of credentials for your job. Looks like a great match right? Look at the demo, certainly looks promising (specially with Jenkins beautiful new BlueOcean UI):

Jenkins Demo

Interested? Let’s dive into it:

What is Hashicorp Vault?

Quite simply, is a tool for managing secrets. What’s really innovative about Vault is that it has methods for establishing both user and machine identity (through Auth Backends), so secrets can be consumed programatically. Identity is ultimately established by a (short lived) token. It also generates dynamic secrets on a number of backends, such as Cassandra, MySQL, PostgreSQL, SQL Server, MongoDB, etc. … I’m not going to cover here how to configure Vault, feel free to head out to the Vault documentation. For all intent and purposes of this document, you can download Vault and run it in “dev mode” for a quick test:

$ vault server -dev
WARNING: Dev mode is enabled!

In this mode, Vault is completely in-memory and unsealed.
Vault is configured to only have a single unseal key. The root
token has already been authenticated with the CLI, so you can
immediately begin using the Vault CLI.

The only step you need to take is to set the following
environment variable since Vault will be talking without TLS:

    export VAULT_ADDR='http://127.0.0.1:8200'

The unseal key and root token are reproduced below in case you
want to seal/unseal the Vault or play with authentication.

Unseal Key: 2252546b1a8551e8411502501719c4b3
Root Token: 79bd8011-af5a-f147-557e-c58be4fedf6c

==> Vault server configuration:

         Log Level: info
           Backend: inmem
        Listener 1: tcp (addr: "127.0.0.1:8200", tls: "disabled")

Please don’t run a Vault cluster in dev mode on production, feel free to reachout through the usual means if you need help.

AppRole

AppRole is a secure introduction method to establish machine identity. In AppRole, in order for the application to get a token, it would need to login using a Role ID (which is static, and associated with a policy), and a Secret ID (which is dynamic, one time use, and can only be requested by a previously authenticated user/system. In this case, we have two options:

  • Store the Role IDs in Jenkins
  • Store the Role ID in the Jenkinsfile of each project

So let’s generate a policy for this role:

$ echo 'path "secret/hello" {
  capabilities = ["read", "list"]
}' | vault policy-write java-example -
Policy 'java-example' written.

In this case, tokens assigned to the java-example policy would have permission to read a secret on the secret/hello path.

Now we have to create a Role that will generate tokens associated with that policy, and retrieve the token:

$ vault write auth/approle/role/java-example \
> secret_id_ttl=60m \
> token_ttl=60m \
> token_max_tll=120m \
> policies="java-example"
Success! Data written to: auth/approle/role/java-example
$ vault read auth/approle/role/java-example
Key                 Value
---                 -----
bind_secret_id      true
bound_cidr_list
period              0
policies            [default java-example]
secret_id_num_uses  0
secret_id_ttl       3600
token_max_ttl       0
token_num_uses      0
token_ttl           3600
$ vault read auth/approle/role/java-example/role-id
Key     Value
---     -----
role_id 67bbcf2a-f7fb-3b41-f57e-88a34d9253e7

Note that in this case, the tokens generated through this policy have a time-to-live of 60 minutes. That means that after an hour, that token is expired and can’t be used anymore. If you’re Jenkins jobs are shorted, you can adjust that time to live now to increase security.

Let’s write a secret that our application will consume:

$ vault write secret/hello value="You've Succesfully retrieved a secret from Hashicorp Vault"
Success! Data written to: secret/hello

Now Jenkins will need permissions to retrieve Secret IDs for our newly created role. Jenkins shouldn’t be able to access the secret itself, list other Secret IDs, or even the Role ID.

$ echo 'path "auth/approle/role/java-example/secret-id" {
  capabilities = ["read","create","update"]
}' | vault policy-write jenkins -

And generate a token for Jenkins to login into Vault. This token should have a relatively large TTL, but will have to be rotated:

$ vault token-create -policy=jenkins
Key             Value
---             -----
token           de1fdee1-72c7-fdd0-aa48-a198eafeca10
token_accessor  8ccfb4bb-6d0a-d132-0f1d-5542139ec81c
token_duration  768h0m0s
token_renewable true
token_policies  [default jenkins]

In this way we’re minimizing attack vectors:

  • Jenkins only knows it’s Vault Token (and potentially the Role ID) but doesn’t know the Secret ID, which is generated at pipeline runtime and it’s for one time use only.

  • The Role ID can be stored in the Jenkinsfile. Without a token and a Secret ID has no use.

  • The Secret ID is dynamic and one time use only, and only lives for a short period of time while it’s requested and a login process is carried out to obtain a token for the role.

  • The role token is short lived, and it will be useless once the pipeline finishes. It can even be revoked once you’re finished with your pipeline.

Jenkins pipeline and configuration

A full example for the project is available here. The Jenkinsfile will be using is this one:

pipeline {
  agent any
  stages { 
    stage('Cleanup') {
      steps {
        withMaven(maven: 'maven-3.2.5') {
          sh 'mvn clean'
        }
        
      }
    }
    stage('Test') {
      steps {
        withMaven(maven: 'maven-3.2.5') {
          sh 'mvn test'
        }
        
      }
    }
    stage('Compile') {
      steps {
        withMaven(maven: 'maven-3.2.5') {
          sh 'mvn compile'
        }
        
      }
    }
    stage('Package') {
      steps {
        withMaven(maven: 'maven-3.2.5') {
          sh 'mvn package'
        }
        
      }
    }
    stage('Notify') {
      steps {
        echo 'Build Successful!'
      }
    }
    stage('Integration Tests') {
      steps {
      sh 'curl -o vault.zip https://releases.hashicorp.com/vault/0.7.0/vault_0.7.0_linux_arm.zip ; yes | unzip vault.zip'
        withCredentials([string(credentialsId: 'role', variable: 'ROLE_ID'),string(credentialsId: 'VAULTTOKEN', variable: 'VAULT_TOKEN')]) {
        sh '''
          set +x
          export VAULT_ADDR=https://$(hostname):8200
          export VAULT_SKIP_VERIFY=true
          export SECRET_ID=$(./vault write -field=secret_id -f auth/approle/role/java-example/secret-id)
          export VAULT_TOKEN=$(./vault write -field=token auth/approle/login role_id=${ROLE_ID} secret_id=${SECRET_ID})
          java -jar target/java-client-example-1.0-SNAPSHOT-jar-with-dependencies.jar 
        '''
        }
      }
    }
  }
  environment {
    mvnHome = 'maven-3.2.5'
  }
}

Lot’s of stuff here, including certain Maven tasks, but we will be focusing on the Integration Tests stage (the last one), what we’re doing here is:

  • Downloading the Vault binary (in my case the ARM linux one, I’ll brag about that in a different blog post :D)

  • Reading credentials from the Jenkins credential store. In this case I’m storing both the ROLE_ID and the VAULT_TOKEN I’ve generated for Jenkins. As mentioned before if you want to split them for more security, you can just use the ROLE_ID as a variable in the Jenkinsfile.

  • I’m doing a set +x to disable verbosity in the shell in order not to leak credentials, although even with -x, in this case I’m just showing the Secret ID (which is useless after I’ve already used it), and the VAULT_TOKEN that I’m going to use to consume credentials, which is short lived, and can be revoked at the end of this runtime just adding a vault token-revoke command.

  • I’m retrieving a SECRET_ID using Jenkins administrative token (that I’ve manually generated before, that’s the only one that would be relatively longed lived, but can only generate SECRET_IDs).

  • I’m doing an AppRole login with the ROLE_ID and the SECRET_ID, and storing that token (short lived).

  • My Java Process is reading VAULT_TOKEN and VAULT_ADDR to contact Vault and retrieve the secret we stored.

The VAULT_TOKEN (And optionally ROLE_ID) are stored in the Credential store in Jenkins:

Jenkins Cred Store

Who has time for testing

And now for a short update, here’s my PuppetConf presentation of this year.

PuppetConf 2016: Puppet on Windows

Don't DROWN on OpenSSL

Yet another OpenSSL vulnerability in the loose. While the vendors release fixes, Puppet to the rescue!. Let’s start by disabling those weak ciphers.

For the apache https server, you can use the puppetlabs-apache module to disable weak ciphers:

class { 'apache::mod::ssl':
  ssl_cipher           => 'EECDH+ECDSA+AESGCM EECDH+aRSA+AESGCM EECDH+ECDSA+SHA384
                           EECDH+ECDSA+SHA256 EECDH+aRSA+SHA384 EECDH+aRSA+SHA256
                           EECDH+aRSA EECDH EDH+aRSA !aNULL !eNULL !LOW !3DES !MD5
                           !EXP !PSK !SRP !DSS !EXPORT',
  ssl_protocol         => [ 'all', '-SSLv2', '-SSLv3' ], #Default value for the module
  ssl_honorcipherorder => 'On', #Default value for the module
}

More information on https://forge.puppetlabs.com/puppetlabs/apache/readme#class-apachemodssl

Using Postfix? No problem, the camptocamp-postfix module can help you there:

postfix::config {
    'smtpd_tls_security_level':            value => 'secure';
    'smtpd_tls_mandatory_protocols':       value => '!SSLv2, !SSLv3';
    'smtpd_tls_mandatory_exclude_ciphers': value => 'aNULL, MD5'
}

More information on https://forge.puppetlabs.com/camptocamp/postfix

How about IIS 7? We can use the puppetlabs-registry module to disable weak ciphers:

class profile::baseline {
  registry_value { 'HKLM\System\CurrentControlSet\Control\SecurityProviders\SCHANNEL\Protocols\SSL 2.0\Server\Enabled':
    ensure => present,
    type   => dword,
    data   => 0x00000000,
  }

  registry_value { 'HKLM\System\CurrentControlSet\Control\SecurityProviders\SCHANNEL\Protocols\SSL 3.0\Server\Enabled':
    ensure => present,
    type   => dword,
    data   => 0x00000000,
  }
}

More information on https://forge.puppetlabs.com/puppetlabs/registry

Extending your Puppet Language Dictionary for Application Orchestration

Time to extend your Puppet Language skills! The new features for application orchestration introduce a number of language constructs you’ll want to know about if you’re planning to describe your applications and supporting infrastructure in the Puppet language.

The Environment Service Resource Type

If you haven’t worked with Puppet types and providers before, I’d strongly suggest you read the documentation on custom types and providers (available here https://docs.puppetlabs.com/guides/custom_types.html and here https://docs.puppetlabs.com/guides/provider_development.html, respectively).

It is worth noting that, unlike your traditional Puppet types and providers, an environment service resource type is far simpler to develop, as you’ll see in the first example below.

The environment service resource is the key to defining the relationship between different software layers. It effectively extends a traditional Puppet type (like file, services, or packages) to describe application services (an SQL database, web server, API layer or a microservice, for example). Like Puppet node types, the environment service resource can (optionally) have a provider, which in this case implements a number of service-related methods — for instance, how to check if an environment service produced by an application component is actually ready for work before continuing the deployment.

The environment service type looks pretty much like any other Puppet type, but it has the property of being a capability. A very simple example could be an SQL resource, as described below:

    Puppet::Type.newtype :sql, :is_capability => true do
      newparam :name, :namevar => true
      newparam :dbname
      newparam :dbhost
      newparam :dbpass
      newparam :dbuser
    end

What I’m doing here is telling the Puppet resource abstraction layer (or rather the service abstraction layer) that I have modeled an SQL database that can be produced by a server (managed with Puppet), for use by one or more servers that need an SQL database. You can think of it as a contract between the servers on your network: What information do they need to exchange in order to interoperate?

The Application Layers

The component in your applications should be iterable — that is to say, you should be able to deploy multiple instances of your layers (multiple web servers, for example). What better way to do that than the way you’ve been doing it historically, with defined types?

Here’s where you can leverage your existing modules, profiles and roles. Remember, Puppet is about code reusability; you don’t need to reinvent the wheel every time you do something.

Just to show you a quick example, here’s a define type for my database layer:

    define apporch_blog::db (
      $dbuser,
      $dbpass,
      $host = $::fqdn,
      ){
       $override_options = {
         'mysqld' => {
           'bind-address' => '0.0.0.0',
         }
       }
        firewall { '101 Allow Connections to Database':
          dport    => 3306,
          proto    => 'tcp',
          action  => 'accept',
        }
        # For simplicity, I’m declaring the mysql::server class here but you’d normally do this outside of the define (Preferably in Hiera).

        class {'::mysql::server':
          root_password    => 'whatever',
          override_options => $override_options,
        }
        mysql::db { $name:
          user     => $dbuser,
          password => $dbpass,
          host     => '%',
          grant    => ['ALL PRIVILEGES'],
        }
      }
    }

As you can see, this is pretty much standard; I’m creating a new type that defines a database. Now going back to the environment service resource I described before, I could potentially produce an SQL resource out of this database, so let’s modify the code to do that:

    define apporch_blog::db (
      $dbuser,
      $dbpass,
      $host = $::fqdn,
      ){
       $override_options = {
         'mysqld' => {
           'bind-address' => '0.0.0.0',
         }
       }
       firewall { '101 Allow Connections to Database':
         dport    => 3306,
         proto    => 'tcp',
         action  => 'accept',
       }
       # It is a bad idea to instantiate a class is this way, since if I'm trying to apply the db class to multiple nodes the catalog compilation may fail, but for simplicity:
       class {'::mysql::server':
         root_password    => 'whatever',
         override_options => $override_options,
       }
       mysql::db { $name:
         user     => $dbuser,
         password => $dbpass,
         host     => '%',
         grant    => ['ALL PRIVILEGES'],
       }
     }
     Apporch_blog::Db produces Sql {
       dbuser => $dbuser,
       dbpass => $dbpass,
       dbhost => $host,
       dbname => $name,
     }

Now I’ve told the Puppet parser that this particular define type is producing a resource, and I’m mapping the parameters of this type to the parameters of this resource.

Just as this define type produces the resource, I’ve created another defined type, to consume it:

    define apporch_blog::web (
      $webpath,
      $vhost,
      $dbuser,
      $dbpass,
      $dbhost,
      $dbname,
      ) {
        package {['php','mysql','php-mysql','php-gd']:
          ensure => installed,
        }
        firewall { '100 Allow Connections to Web Server':
          dport    => 80,
          proto    => 'tcp',
          action  => 'accept',
        }

        include ::apache
        include ::apache::mod::php
        apache::vhost { $vhost:
          port    => '80',
          docroot => $webpath,
          require => [File[$webpath]],
        }

        file { $webpath:
          ensure => directory,
          owner => 'apache',
          group => 'apache',
          require => Package['httpd'],
        }
        class { '::wordpress':
          db_user        => $dbuser,
          db_password    => $dbpass,
          db_host        => $dbhost,
          db_name        => $dbname,
          create_db      => false,
          create_db_user => false,
          install_dir    => $webpath,
          wp_owner       => 'apache',
          wp_group       => 'apache',
        }
      }
    Apporch_blog::Web consumes Sql {

    }

Please note two things in this particular code extract:

  • I’m declaring variables in the defined type that are going to be filled with parameters from the environment service resource.
  • I’m also declaring that this defined type consumes the environment service resource, but I’m not mapping any variables. That’s because I’m using the same names for the variables.

The Application Construct

Now let’s glue everything together. The application construct allows us to model the application and declare the dependencies within the layer:

    application apporch_blog (
      $dbuser  = 'wordpress',
      $dbpass  = 'w0rdpr3ss',
      $webpath = '/var/www/wordpress',
      $vhost   = 'wordpress.puppetlabs.demo',
      ) {
        apporch_blog::db { $name:
          dbuser => $dbuser,
          dbpass => $dbpass,
          export => Sql[$name],
        }
        apporch_blog::web { $name:
          webpath => $webpath,
          consume => Sql[$name],
          vhost   => $vhost,
        }
    }

As you can see, it’s here where I’m actually defining the variables to configure the services and create the environment service resource.

The Site Construct

As with your layers, you should be able to deploy your application in multiple instances. That’s where the site construct comes into play. In my particular example, I’m defining it in the site.pp file for the particular environment. But here’s where you actually instantiate your application and glue it to the specific nodes (using the hostnames for the specific nodes):

    site {
      apporch_blog { 'example':
          nodes           => {
            Node['db.demo'] => [ Apporch_blog::Db[ 'example' ]],
            Node['www.demo'] => [ Apporch_blog::Web[ 'example' ]],
        }
      }
    }

In all fairness, I had the unfair advantage of using the Puppet language and modules for quite a while now, but as you can see, once again, the code is human readable and draws from the existing modules on the Puppet Forge. As you can imagine, while this is an extremely simple example, the possibilities are endless:

  • Think of your microservices running in Docker containers — this is a great way of actually tying the whole application together. See an example here.
  • Load balancing? Sure, your web servers can produce resources that are consumed by the load balancer.
  • You can easily replace the nodes in your application, assuming you have current backups. You might be able to re-deploy your database and have Puppet automatically update your web servers.

Now that you have an idea on how the language looks like, you should read the full documentation. It’s worth noting that the Puppet Orchestrator, which is the set of tools that will actually make the orderly deployment possible, is not referenced here. But you can learn about it from the documentation linked above and below.

[*] This article was originally authored for the Puppet Labs Blog (http://blog.puppetlabs.com).

Who has time for testing

Yeah, I know I’ve neglected my Blog, but hey, I’ve been busy!.

Anyway, here’s the video of my PuppetConf presentation on Testing and CI. Enjoy

PuppetConf 2015: Who has time for testing

Automating Networks

I did a short presentation on how to automate the configuration of Arista devices with Puppet on the Arista meetup. Luckily I recorded it, for those of you who weren’t lucky enough to see it live. Video of the screencast is below.

Automating Networks - Puppet with Arista Switches

Creating an API with Sinatra and wrapping Puppet Code around it

Another week, another commute to a different country. You do have to love Europe!. Anyway, with an hour on my hands, I starting thinking back to, well, probably the question I get asked the most: “What can you do with Puppet?”. There is probably no short or straight answer to it, so I tend to start enumerating anything that might be relevant, and lately I’ve been finishing up with, “and also, if you have anything that expose resources through an API, well you can wrap Puppet Code around it!”. An excellent example of this, could be Gareth’s AWS module. It is also, too complicated to illustrate a principle, since it’s a fairly complex module, with quite a bit of Ruby code. For those who don’t know me, I don’t do Ruby… well… kind of.

Ruby does have a number of brilliant gems (see what I did there?), and since I have been hearing about Ruby, the one that always caught my eye, was Sinatra.

Not this Sinatra. Thanks wikimedia commons for the image!

It is one of those things that look amazingly simple, that are really powerful, and of course, I always wanted to play around with. With all these in mind, I decided to write an extremely simple REST API, and a Puppet Module around it with very simple curl calls, to demo how this would look like, and of course, I did it my way.

The absolutely basic Sinatra syntax is:

httpverb '/httppath' do
  rubycode
end

So let’s look at a commented example:

# HTTP GET verb to retrieve a specific item. Returns 404 if item is not present.
# HTTP Verb and Path definition
get '/items/:key' do
  # Check if the string is actually present in the file and give a quick message in case this is being opened with a browser. Sinatra returns 200 OK as default.
  unless File.readlines("file.out").grep(/#{params['key']}/).size == 0 then
    "#{params['key']} exists in file!"
  else
  # or return the appropiate http code.
    status 404
  end
end

So with a few bits and bolts of Ruby code here and there, here’s my full API example, with three basic verbs.

#Extremely Simple API with three basic verbs.
require 'sinatra'
require 'fileutils'
require 'tempfile'

# HTTP PUT verb creates an item on the file. Returns HTTP Code 422 if already exists.
put '/items/:key' do
  unless File.readlines("file.out").grep(/#{params['key']}/).size != 0 then
    "Created #{params['key']}"
    open('file.out', 'a') { |f|
      f.puts "#{params['key']}\n"
    }
  else
    status 422
  end
end

# HTTP GET verb to retrieve a specific item. Returns 404 if item is not present.
get '/items/:key' do
  unless File.readlines("file.out").grep(/#{params['key']}/).size == 0 then
    "#{params['key']} exists in file!"
  else
    status 404
  end
end

# HTTP GET verb to retrieve all the items.
get '/items' do
  file = File.open("file.out")
  contents = ""
  file.each {|line|
            contents << line
  }
  "#{contents}"
end

# HTTP DELETE verb to remove a specific item. With a horrendous hack to recreate the file without the specific key. Returns 404 if the item is not present.
delete '/items/:key' do |k|
  unless File.readlines("file.out").grep(/#{params['key']}/).size == 0 then
    tmp = Tempfile.new("extract")
    open('file.out', 'r').each { |l| tmp << l unless l.chomp ==  params['key'] }
    tmp.close
    FileUtils.mv(tmp.path, 'file.out')
    "#{params['key']} deleted!"
  else
    status 404
  end
end

So I’m sure there will be a lot of Ruby experts criticizing how that code is written, to be honest, and taking into account is the first piece of Ruby code I wrote, and that I lifted some examples from everywhere, I’m quite happy with my Frankenstein API.

So let’s curl around to see how my API works.

If I PUT an item there, it saves it on the file, but of course if the item exists, it won’t allow me to do it again:

[ncorrare@risa ~]# curl -vX PUT http://localhost:4567/items/item2
* Hostname was NOT found in DNS cache
*   Trying ::1...
* connect to ::1 port 4567 failed: Connection refused
*   Trying 127.0.0.1...
* Connected to localhost (127.0.0.1) port 4567 (#0)
> PUT /items/item2 HTTP/1.1
[...]
>
< HTTP/1.1 200 OK
< Content-Type: text/html;charset=utf-8
[...]
* Connection #0 to host localhost left intact

[ncorrare@risa ~]# curl -vX PUT http://localhost:4567/items/item2
* Hostname was NOT found in DNS cache
*   Trying ::1...
* connect to ::1 port 4567 failed: Connection refused
*   Trying 127.0.0.1...
* Connected to localhost (127.0.0.1) port 4567 (#0)
> PUT /items/item2 HTTP/1.1
[...]
>
< HTTP/1.1 422 Unprocessable Entity
[...]
<
* Connection #0 to host localhost left intact
[ncorrare@risa ~]#

Note that when I try to PUT the item the second time, it returns an HTTP code of 422. By the way, I spent a bit of time researching which should be the right http code to return in this case. I think I got it right but if anyone has a table documenting how to map these, please do send it over.

By the way, depending on the sinatra / webrick version, you may need to specify a Content-Length (even if its zero) or you might get an HTTP/1.1 411 Length Required response. It would look like this

/usr/bin/curl -H 'Content-Length: 0' -fIX PUT http://localhost:4567/items/item1

Now how about a couple of GETs

[ncorrare@risa ~]# curl -vX GET http://localhost:4567/items
* Hostname was NOT found in DNS cache
*   Trying ::1...
* connect to ::1 port 4567 failed: Connection refused
*   Trying 127.0.0.1...
* Connected to localhost (127.0.0.1) port 4567 (#0)
> GET /items HTTP/1.1
[...]
>
< HTTP/1.1 200 OK
< Content-Type: text/html;charset=utf-8
[...]
<
item1
item2
* Connection #0 to host localhost left intact
[ncorrare@risa ~]# curl -vX GET http://localhost:4567/items/item2
* Hostname was NOT found in DNS cache
*   Trying ::1...
* connect to ::1 port 4567 failed: Connection refused
*   Trying 127.0.0.1...
* Connected to localhost (127.0.0.1) port 4567 (#0)
> GET /items/item2 HTTP/1.1
[...]
>
< HTTP/1.1 200 OK
< Content-Type: text/html;charset=utf-8
[...]
* Connection #0 to host localhost left intact
item2 exists in file!
[ncorrare@risa ~]# curl -vX GET http://localhost:4567/items/item3
* Hostname was NOT found in DNS cache
*   Trying ::1...
* connect to ::1 port 4567 failed: Connection refused
*   Trying 127.0.0.1...
* Connected to localhost (127.0.0.1) port 4567 (#0)
> GET /items/item3 HTTP/1.1
[...]
< HTTP/1.1 404 Not Found
< Content-Type: text/html;charset=utf-8
[...]
<
* Connection #0 to host localhost left intact

Please note that GET, of course, if the default action, but I’m specifying it just for documentation purposes. A GET to /items is returning the whole contents of the file, while a GET to /items/specificitem, checks if the items (a string in this case) exists on the file. A GET to a non-existent item returns 404.

Finally, let’s delete something.

[ncorrare@risa ~/puppetlabs/demo/razor]# curl -vX DELETE http://localhost:4567/items/item2
* Hostname was NOT found in DNS cache
*   Trying ::1...
* connect to ::1 port 4567 failed: Connection refused
*   Trying 127.0.0.1...
* Connected to localhost (127.0.0.1) port 4567 (#0)
> DELETE /items/item2 HTTP/1.1
[...]
>
< HTTP/1.1 200 OK
< Content-Type: text/html;charset=utf-8
[...]
<
* Connection #0 to host localhost left intact
item2 deleted!
[ncorrare@risa ~/puppetlabs/demo/razor]# curl -vX DELETE http://localhost:4567/items/item2
* Hostname was NOT found in DNS cache
*   Trying ::1...
* connect to ::1 port 4567 failed: Connection refused
*   Trying 127.0.0.1...
* Connected to localhost (127.0.0.1) port 4567 (#0)
> DELETE /items/item2 HTTP/1.1
[...]
>
< HTTP/1.1 404 Not Found
< Content-Type: text/html;charset=utf-8
[...]
<
* Connection #0 to host localhost left intact
[ncorrare@risa ~/puppetlabs/demo/razor]#

For all intent and purposes, that’s a great API, it even has error checking!. But the best is yet to come, now is time to actually wrap a Puppet module around it. As I’ll be using exec, I’ve to be spot on, around managing errors. Now here’s the kicker… in order for curl to return an HTTP error code >= 400 as an exit code > 0, you have to use the -f parameter in curl.

So in this case, I basically created a module (which is available along with the full API code in https://github.com/ncorrare/ncorrare-itemsapi). The key here, is the resource definition:

define itemsapi (
  $ensure,
)
  {
    validate_re($ensure, ['present','absent'])
    if $ensure=='present' {
      exec { 'create item' :
        command => "/usr/bin/curl -H 'Content-Length: 0' -fIX PUT http://localhost:4567/items/${name}",
        unless  => "/usr/bin/curl -fIX GET http://localhost:4567/items/${name}",
      }
    }
    elsif $ensure=='absent' {
      exec { 'delete item' :
        command => "/usr/bin/curl -fIX DELETE http://localhost:4567/items/${name}",
        onlyif  => "/usr/bin/curl -fIX GET http://localhost:4567/items/${name}",
      }
    } else {
      fail('ensure parameter must be present or absent')
    }
  }

That’s it! You know have a new type, to manage an API, which is fully idempotent, so you can basically:

itemsapi { "whatever":
  ensure => "present",
}

or:

itemsapi { "whatever":
  ensure => "absent",
}

By the way, can you find the references to Sinatra (the actual one) in the blog post? There are two (I think!)