Razor by example

A long long time ago, in a country far away, I wrote the Network Install guide for Fedora describing how to set up a tftp/dhcp server to PXE Boot machines, with a nice menu and all that. At the time, all the cool kids where using Satellite / Spacewalk, or were looking at server MAC Addresses in their CMDB / Inventory. It was published in 2008, I’m not a cool kid anymore, and it looks really outdated (much like my profile in the Fedora Wiki, including a picture from 11 years and 15 kilos ago).

So it’s time to redeem myself in front of all those poor people that have been maintaning /var/lib/tftpboot directories, and dhcpd.conf files. In comes Razor, with a different approach to things. Razor is both a microkernel and a server side component. A bare metal server (or unprovisioned VM) boots this microkernel, collects all the inventory information, and sends it to the server through an API call.

In turn, the server Razor server will evaluate that inventory information against a set of rules, and will provision the server with a base operating system (Linux, Windows, ESXi), and also configure a set of post install tasks (a.k.a. Brokers) in order to hand off the node to a configuration management tool, such as Puppet, or another one related to some culinary aspect.

There is a lot of documentation available on how to set up a Razor server, and I’m not particularly a fan of reinventing the wheel. Of course you need a DHCP Server, (or if you’re into that, you can burn a boot.iso image, though you’ll still need a DHCP server to provide basic network configuration in order for the target server to reach the Razor Sever).

As for which DHCP server to choose, I’m using one bundled with my Mikrotik router, but in a real world example, you’d probably use one bundled on a proper Firewall, or at least ISC DHCPD. Configurating it is far from rocket science:

  • If your network booting ROM supports iPXE, the filename is ‘bootstrap.ipxe’, there is also an ‘undionly.kpxe’ image (dhcp option 67, filename in ISC DHCPd).
  • Your should set up a tftp server (xinetd, dnsmasq, others) and of course add the parameter to your DHCP server (dhcp option 66, next-server in ISC DHCPd).

Here are a couple of examples lifted from the Razor Server wiki:

# This works for ISC DHCP Server 4.1-ESV-R4 (ubuntu 12.04 LTS default)
subnet 192.168.1.0 netmask 255.255.255.0 {
  range 192.168.1.200 192.168.1.250;
  option subnet-mask 255.255.255.0;
  if exists user-class and option user-class = "iPXE" {
    filename "bootstrap.ipxe";
  } else {
    filename "undionly.kpxe";
  }
  next-server 192.168.1.100;
}
#This is an example for dnsmasq
dhcp-match=IPXEBOOT,175
dhcp-boot=net:IPXEBOOT,bootstrap.ipxe
dhcp-boot=undionly.kpxe
# TFTP setup
enable-tftp
tftp-root=/var/lib/tftpboot

The PXE image will in turn chainload either the microkernel, or the kernel/initrd of the appropiate Operating System (or Windows Pre-Exectution Environment).

In order to set up your Razor server, I’d advise you to use the packages from the PuppetLabs repository, available in yum.puppetlabs.com (package is called razor-server). Or better yet, just use Puppet to set it up

puppet module install puppetlabs-razor
puppet apply -t -e 'include razor'

This will set up the Razor Server in the Puppet Master.

Now it’s time to obtain the PXE images. You can get the ‘undionly.kpxe’ file here, and the bootstrap.ipxe file from the razor server itself. Just curl the contents of http://razor:8080/api/microkernel/bootstrap?nic_max=N to a file, but don’t use localhost, since it actually hardcodes the server name. Drop those two in your tftp home directory.

Technically, your infrastructure is ready to start collecting node information, boot a new node from the network, and hopefully, you’ll see this:

Razor Booting Up

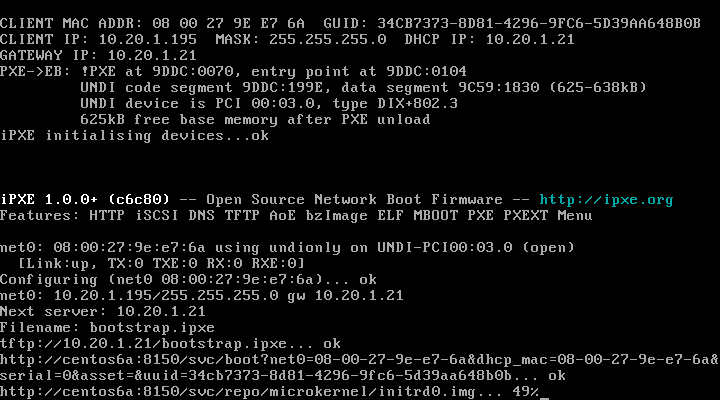
That’s razor booting by the way, give it a couple of minutes (about two in my demo environment) and all your facts about that node will be collected.

So when your node is inventoried, you can issue a ‘razor nodes’ command to see which nodes are ready to be provisioned with razor.

[root@centos6a ~]# razor nodes
From https://localhost:8151/api/collections/nodes:

+-------+-------------------+--------------------+--------+----------------+
| name  | dhcp_mac          | tags               | policy | metadata count |
+-------+-------------------+--------------------+--------+----------------+
| node1 | 08:00:27:27:14:20 | virtual, bigvirtual| ---    | 0              |
+-------+-------------------+--------------------+--------+----------------+
| node2 | 08:00:27:46:c3:55 | (none)             | ---    | 0              |
+-------+-------------------+--------------------+--------+----------------+
| node3 | 08:00:27:9e:e7:6a | (none)             | ---    | 0              |
+-------+-------------------+--------------------+--------+----------------+

Query an entry by including its name, e.g. `razor nodes node1`

Since razor is nice enough to tell us to keep digging, well.. lets!

[root@centos6a ~]# razor nodes node1 hw_info
From https://localhost:8151/api/collections/nodes/node1:

  mac: [08-00-27-27-14-20]

Query additional details via: `razor nodes node1 hw_info [mac]`

[root@centos6a ~]# razor nodes node1 facts
From https://localhost:8151/api/collections/nodes/node1:

                 virtual: virtualbox
              is_virtual: true
              interfaces: enp0s3,lo
        ipaddress_enp0s3: 10.20.1.156
       macaddress_enp0s3: 08:00:27:27:14:20
          netmask_enp0s3: 255.255.255.0
              mtu_enp0s3: 1500
            ipaddress_lo: 127.0.0.1
              netmask_lo: 255.0.0.0
[..]
   blockdevice_sr0_model: CD-ROM
            blockdevices: sda,sr0
                     gid: root
           system_uptime:
                            seconds: 124
                              hours: 0
                               days: 0
                             uptime: 0:02 hours
                uniqueid: 007f0100

Query additional details via: `razor nodes node1 facts [dhcp_servers, os, processors, system_uptime]`

Now it’s time to get a repository set up. As an example, let’s create one for Centos 6.6

razor create-repo --name centos-6.6 --task centos --iso-url http://mirror.as29550.net/mirror.centos.org/6.6/isos/x86_64/CentOS-6.6-x86_64-bin-DVD1.iso

As you can imagine, this will take a while. Pop up a new shell, and let’s look at brokers in the meanwhile.

Brokers, are basically the way to handover the server to a post-install configuration management tool, (such as Puppet), and also run some post install tasks.

If you want to create your own broker (to set up DNS records maybe?), you can read the official documentation, and other prebuilt brokers are documented in the source tree.

In order to set up a basic broker to handover the server to Puppet Enterprise, create it in the following way:

razor create-broker --name pe --broker-type puppet-pe --configuration server=puppet-master.example.com

Finally, we have tags and policies. Tags are applied to server based on ‘rules’ that evaluate ‘facts’.

As a quick example, if you were to create a tag for virtual servers, it would probably look somewhat like this:

[root@centos6a ~]# razor tags
From https://localhost:8151/api/collections/tags:

+--------------+--------------------------------------+-------+----------+
| name         | rule                                 | nodes | policies |
+--------------+--------------------------------------+-------+----------+
| virtual      | ["=", ["fact", "is_virtual"], true]  | 2     | 1        |
+--------------+--------------------------------------+-------+----------+

Please take minute here to glance at those amazing tables!. Here’s another example for the official documentation. To create a tag for servers with less than a gig of RAM:

razor create-tag --name small --rule '["<", ["num", ["fact", "memorysize_mb"]], 1024]'

Finally, you need to create a Policy. Bare in mind once a policy it’s created, Razor will start provisioning all your nodes as per that policy, so in a brownfield environment, either try to be as specific as possible, or follow these suggestions.

[root@centos6a ~]# razor policies
From https://localhost:8151/api/collections/policies:

+-------------+----------+-------+--------+---------+---------+---------+------+
|name         |repo      |task   | broker | enabled |max_count| tags    | nodes|
+-------------+----------+-------+--------+---------+---------+---------+------+
|centos-smvirt|centos-6.6|centos | pe     | true    |20       | smlvirt | 1    |
+-------------+----------+-------+--------+---------+---------+---------+------+
|win-bigvir   |win2012r2 |w2012r2| pe     | true    |20       | bigvirt | 1    |
+-------------+----------+-------+--------+---------+---------+---------+------+
|centos-virt  |centos-6.6|centos | pe     | true    |20       | virtual | 0    |
+-------------+----------+-------+--------+---------+---------+---------+------+

Query an entry by including its name, e.g. `razor policies centos-for-smallvirtual`

Taking into account that it took me a couple of days to write this article, I’d say my technological debt with the community is now settled!.

Docker, You're doing it wrong

I tend (as many people) to blame a technology for what people actually do with that technology. But think about it, who’s to blame for Hiroshima, the A-Bomb? Or the guys from the Manhattan Project?

I know, probably way out of context, and comparing Docker with the A-bomb would definitely get me a bit of heat in certain circles. But here’s the thing, this article is not titled “I hate Docker” (must confess the idea crossed my mind), but it’s rather “Docker: You’re doing it wrong”.

Let’s begin by saying that containers is not a new idea, they have been around for ages in Solaris, Linux, AIX among others, and soon enough, in Windows!. We actually have to thank Docker for that one. Docker was definitely innovative about the way they’re packaged, deployed, etc. … It’s a great way to run micro services, you’d download this minimal image with nginx, or node, or {insert your language/toolkit/app server here} and run your workload.

Now here’s the problem with that, a lot people (ejem… developers) will download an image with a stack ready to go, bundle their script, and tell someone from the ops team “Hey go and deploy this, you don’t need to worry about the dependencies”. Now a great ops guy, will answer “That’s great, but:”

  • Where did you get this software from?
  • What’s inside this magic container?
  • Who’s going to patch it?
  • Who’s going to support it?
  • What about security?

And so begins a traditional rant, with phrases like “code monkey” and “cable thrower/hardware lover” that could last for hours debating what’s the best way to do deployments.

Hey, remember? We’re in the DevOps age now, we don’t fight over those meaningless things anymore. We do things right, we share tooling and best practices.

So let’s be a little more pedagogic about Docker from a System Administrator perspective:

  • Over 30% of the images available in the Docker Hub contain vulnerabilities, according to this report, so where did you get this software from is kind of a big thing.
  • Generally, downloading images “just because it’s easier” leads to questions like what’s that container actually running. Granted, it’s you that actually expose the ports open in the container, but what if some weird binary decides to call home?
  • If you’re about to tell me that your containers are really stateless, and you don’t patch and that in CI you create and destroy machines and you don’t need to patch, I’ve two words for you, ‘Heartbleed much?’. Try to tell your CIO, or your Tech Manager you don’t need to patch.
  • Is your image based on an Enterprise distribution? How far has it been tuned? Who do I call when it starts crashing randomly.
  • XSA-108 anyone? Remember cloud reboots? Even a mature technology that has been on the market for years is prone to have security issues, so there is no guarantee that something weird running in your container might actually hit a 0-day and start reading memory segments that don’t belong to it.

Vulnerabilities in Docker Images, extracted from http://www.infoq.com/news/2015/05/Docker-Image-Vulnerabilities

Now I don’t pretend to discourage you from actually using Docker, again, it’s a great tool if you use it wisely. But build your own images!. Understand what you’re putting into them. Make it part of your development cycle to actually update them and re-release them. Use it as it was designed, i.e. stateless!.

I know that this might cause flame wars and you are desperately looking for a comments box to express your anger on how I’ve been trashing Docker.

  • First, I haven’t!. Docker is a great tool.
  • Second, if you want to correct me on any of the points above, there is enough points to contact me, and I’m happy to rectify my views.
  • Third, feel free to call me a caveman on your own blog, but progress shouldn’t compromise security!.

My CI Workflow

Don’t get me wrong, I like Jenkins, unlike every other Java app. But I’m a Sysadmin (at least in spirit), and there are still things that I need to get used to from the development world. But Jenkins is:

  • Extremely flexible (or extremely complicated)
  • Another App I’d need to host somewhere (not that I’m laking IT resources)
  • As my manager likes to put it, using a Ferrari to drive at 20 miles per hour (that’s been taken out of context by the way)

I needed something extremely simple, since I’ve a module published in the Puppet Forge (hopefully more soon enough), and I want to run Unit Tests on it before I actually publish new releases. In comes Travis CI. It’s probably way more powerful that what I’m using it for, but it’s simple enough for me go get it integrated on my development workflow because:

  • It integrates with GitHub, so I don’t need to write and troubleshoot any custom hooks.
  • It email’s me when my build fails
  • I’ve a nice tag that I can add into my README.md to force me to fix my builds
  • It’s extremely simple to configure

How simple you may ask?

  • Head onto the Travis-CI Website
  • Log-in with your GitHub Account, and enable the repo’s you want to manage

Now those repositories need a bit of extra love to be tested with Travis. You need to create a .travis.yml file with the configuration.

---
language: ruby
bundler_args: --without system_tests
script: "bundle exec rake validate && bundle exec rake lint && bundle exec rake spec SPEC_OPTS='--format documentation'"
matrix:
  fast_finish: true
  include:
  - rvm: 1.9.3
    env: PUPPET_GEM_VERSION="~> 3.0"
  - rvm: 2.0.0
    env: PUPPET_GEM_VERSION="~> 3.0"
  - rvm: 2.0.0
    env: PUPPET_GEM_VERSION="~> 4.0"
notifications:
  email: nicolas@mymailserver.com

Now I’m assuming here that you have your Gemfile and Rakefile properly set up, in my case my jobs are as follows:

require 'rubygems'
require 'puppetlabs_spec_helper/rake_tasks'
require 'puppet-lint/tasks/puppet-lint'
PuppetLint.configuration.send('disable_80chars')
PuppetLint.configuration.ignore_paths = ["spec/**/*.pp", "pkg/**/*.pp"]

desc "Validate manifests, templates, and ruby files"
task :validate do
  Dir['manifests/**/*.pp'].each do |manifest|
    sh "puppet parser validate --noop #{manifest}"
  end
  Dir['spec/**/*.rb','lib/**/*.rb'].each do |ruby_file|
    sh "ruby -c #{ruby_file}" unless ruby_file =~ /spec\/fixtures/
  end
  Dir['templates/**/*.erb'].each do |template|
    sh "erb -P -x -T '-' #{template} | ruby -c"
  end
end

task :default => [:validate, :spec, :lint]

Good news if you don’t understand any of that, puppet module generate actually set’s that up for you!

So in my case, I’m doing parsing validation, linting and spec testing on my module. Even if you don’t write spec tests, just doing parser validation and linting is a great start!

##Keeping you honest You need to write spec tests to cover your cases, the more spec tests you write, the more you can be sure that you’re not breaking anything when changing your code. Luckily there is a great tool to help you with that, and its Coveralls.

How much of my code do my tests cover Where do I need to work a bit more

To set up Coveralls, the instructions are pretty clear, but basically you’d need to:

  • Include the Coveralls gem in the Gemfile
source 'https://rubygems.org'

puppetversion = ENV.key?('PUPPET_VERSION') ? "= #{ENV['PUPPET_VERSION']}" : ['>= 3.3']
gem 'puppet', puppetversion
gem 'puppetlabs_spec_helper', '>= 0.1.0'
gem 'puppet-lint', '>= 0.3.2'
gem 'facter', '>= 1.7.0'
gem 'rake'
gem 'rspec-puppet'
gem 'dpl'
gem 'coveralls', require: false

(That last lines add coveralls by the way).

And add Coveralls to your testing suite

require 'coveralls'
Coveralls.wear!
require 'puppetlabs_spec_helper/module_spec_helper'

The only gotcha so far, is that you need to add an environment variable (USENETWORK=true) in Travis to allow the test to post the result to Coveralls. You can do this through the Web Interface, or in your .travis.yml file.

Setting the environment variable in Travis

What's this R10K thing anyway

So you have been using Puppet for a while, and your code is everywhere!.

Infrastructure as Code allows you to do amazing things, so soon enough you’ll realize that it can also become a nightmare, if you haven’t been “doing it right”. So if you haven’t seen Gary Larizza’s talk in PuppetConf 2014 called Doing the refactor dance I’d strongly suggest you do that, and this article will be waiting for you once you’re done.

Now that your code is actually structured in a sort of logic way, let’s be honest, it’s not going to stay that way much longer. Code evolves, and so your infrastructure, and we need a way to track those code changes, evolve those modules from Testing, to QA, to Production. What about their dependencies?. So if this are the kind of issues you’re starting to face, R10K is the keyword you should be googling. If you have Puppet Enterprise, good news, its actually included as part of Code Manager from 3.8 onwards. If not, go ahead and issue a gem install r10k. It won’t bite.

R10K takes a Control Repository, which would hold a Puppetfile, describing what modules are required, your Hiera data, your site.pp, etc. … Everything but the modules. R10K will go and deploy a Puppet Environment out of each branch of that Control Repository.

Consider the following example, available on my github repository:

  • My repository has two branches, production and testing.

    • On the production branch, I’ve a Puppetfile that looks like this:
  forge "http://forge.puppetlabs.com"

  # Modules from the Puppet Forge
  mod 'puppetlabs/apache'
  mod 'puppetlabs/ntp'

  # Modules from Github using various references
  mod 'notifyme',
    :git => 'https://github.com/ncorrare/ncorrare-notifyme.git',
    :tag => '0.0.3'
  

This Puppetfile is telling R10K how my production environment looks like. In this case, I’m pulling two modules from the forge, and I’ve one module from my internal repository.

  • In the testing branch, my file looks slightly different.
  forge "http://forge.puppetlabs.com"

  # Modules from the Puppet Forge
  mod 'puppetlabs/apache'
  mod 'puppetlabs/ntp'

  # Modules from Github using various references
  mod 'notifyme',
    :git => 'https://github.com/ncorrare/ncorrare-notifyme.git',
    :tag => '0.0.4'
  

So I’m actually using a different module version for the notifyme module.

If you need a complete base environment to start with, I’d strongly recommend you head to Terri Harber’s repository, where she has a very good example of one.

Once your control repo is ready, well that’s half the job. You probably want to start with a blank Puppet Master, since R10K by default will delete every module and every environment that’s not specified in the Control Repository.

# The location to use for storing cached Git repos
cachedir: '/var/cache/r10k'

# A list of git repositories to create
sources:
  # This will clone the git repository and instantiate an environment per
  # branch in the directory you've specified. Check your puppet.conf file.
  ncorrare:
    remote: 'https://github.com/ncorrare/environments.git'
    basedir: '/etc/puppetlabs/puppet/environments/'

If you now proceed to run r10k deploy environment -pv, voila!, R10K is already setting up your Puppet Environments for you. Now that you understand the basics behind R10K, look into the r10k module in the Puppet Forge for instructions into how to have Puppet manage R10K (that will eventually manage your Puppet environments, and there we go full circle again).